この章では実際に画面から検索し、DBのデータを取得するというところまでをゴールに実施していきます。
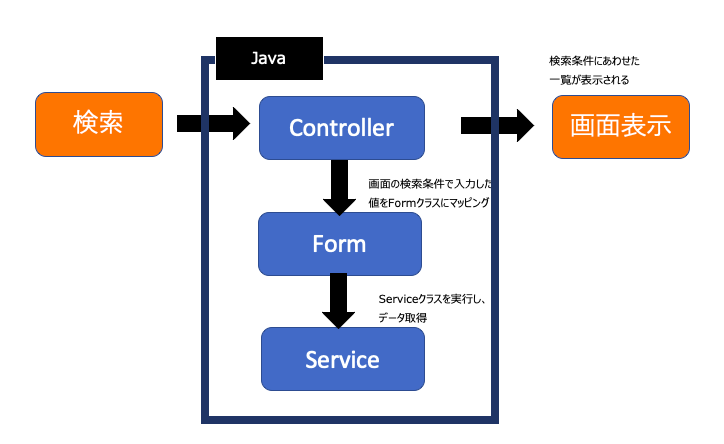
概要
検索条件で入力した値をFormクラスにマッピングします。
Formクラスに格納したデータをServiceクラスに渡して、それを元にデータを取得します。
取得したデータをHTML内で表示するよう記載していきます。
Form
Formクラスを作成していきます。
formパッケージを作成し、「GetForm.java」を作成します。
このクラスは画面からの検索条件を格納するためのクラスとなります。
全てString型で受け取るようにしています。
package diary.form.diary;

public class GetForm {

	private String category;
	private String date;
	public String getCategory() {
		return category;
	}
	public void setCategory(String category) {
		this.category = category;
	}
	public String getDate() {
		return date;
	}
	public void setDate(String date) {
		this.date = date;
	}

}
Controller
画面からの入力データを受け取るにあたって「DiaryController.java」も修正していきます。
package diary.controller;

import java.util.List;

import org.springframework.beans.factory.annotation.Autowired;
import org.springframework.stereotype.Controller;
import org.springframework.ui.Model;
import org.springframework.web.bind.annotation.GetMapping;
import org.springframework.web.bind.annotation.ModelAttribute;
import org.springframework.web.bind.annotation.RequestMapping;

import diary.entity.Diary;
import diary.form.GetForm;
import diary.service.DiaryService;

@Controller
@RequestMapping("/diary")
public class DiaryController {

	private final DiaryService diaryservice;

	@Autowired
	public DiaryController(DiaryService diaryservice) {
		this.diaryservice = diaryservice;
	}

	/**
     * 日記アプリの一覧画面を表示
     * @param model
     * @return resources/templates/list.html
     */
    @GetMapping
    public String diaryList(
    	@ModelAttribute GetForm form,
    	Model model
    ) {
    	List<Diary> list = diaryservice.findList(form);
    	model.addAttribute("list", list);
        model.addAttribute("getForm", form);
        return "list";
    }
}
追記箇所について説明していきます。
20~25行目
Serviceクラスを利用してデータを取得するため、依存性の注入を行なっています。
34行目
@ModelAttributeを引数に指定すると画面からのパラメータをformクラスにバインドすることが可能です。なのでここでformクラスに画面からの入力データを格納しています。
37行目
Serviceクラスを実行し、日記一覧のデータを取得します。
38~39行目
このメソッドの引数にModelを指定しています。これを設定することで画面側にデータを渡すことができます。38行目では、日記一覧のデータを「list」という名前で渡しています。
39行目
検索条件で設定した値を「getForm」という名前で渡しています。それによって検索後の画面でも検索条件のデータを設定したままにすることが可能です。
ただこのままだと37行目の「diaryservice.findList(form);」という部分でエラーになっているかと思います。これにはServiceクラスを修正する必要があります。
Service
「DiaryService.java」を修正します。今まではfindListメソッドに引数を設定していませんでした。
検索条件を取得するように変更しましたので、メソッドの引数を設定します。
また、daoクラスにもformを渡すように修正します。
  public List<Diary> findList(GetForm form) {
        return dao.findList(form);
 }
これでもまだエラーとなるため次にrepository(DAOクラス)を修正していきます。
repository
まずはインターフェース「IDiaryDao.java」のfindListを修正していきます。
引数にformを受け取れるようにします。
List<Diary> findList(GetForm form);
次に「DiaryDao.java」のfindListメソッドを修正します。
    @Override
	public List<Diary> findList(GetForm form) {
		StringBuilder sqlBuilder = new StringBuilder();
		sqlBuilder.append("SELECT d.id, d.category, d.title, d.content, TO_CHAR(d.date, 'YYYY/MM/DD') AS date, d.update_datetime, c.name "
				+ "FROM diary AS d INNER JOIN code AS c ON d.category = c.cd "
				+ "WHERE c.group_cd = '01'");

		// パラメータ設定用Map
		Map<String, String> param = new HashMap<>();
		// パラメータが存在した場合、where句にセット
		if(form.getCategory() != null && form.getCategory() != "") {
			sqlBuilder.append(" AND c.cd = :cd");
			param.put("cd", form.getCategory());
		}
		if(form.getDate() != null && form.getDate() != "") {
			sqlBuilder.append(" AND TO_CHAR(d.date, 'YYYY/MM') = :date");
			param.put("date", form.getDate());
		}

		String sql = sqlBuilder.toString();

		//タスク一覧をMapのListで取得
		List<Map<String, Object>> resultList = jdbcTemplate.queryForList(sql, param);
		//return用の空のListを用意
		List<Diary> list = new ArrayList<Diary>();

		//データをDiaryにまとめる
		for(Map<String, Object> result : resultList) {
			Diary diary = new Diary();
			diary.setId((int)result.get("id"));
			diary.setCategory((String)result.get("category"));
			diary.setTitle((String)result.get("title"));
			diary.setContent((String)result.get("content"));
			diary.setDate((String)result.get("date"));
			diary.setUpdate_datetime((Timestamp)result.get("update_datetime"));
			diary.setName((String)result.get("name"));
			list.add(diary);
		}
		return list;
	}
変更のポイントは2つです。
2行目
引数にformクラスを指定。
8行目〜18行目
formの値が存在すれば、SQLにWhere句の条件を追加するということを記載しています。
(検索条件が入力されていればということです)
HTML修正
検索条件を渡す、日記一覧を表示する、という処理を記載していきます。
「list.html」を修正していきます。
form作成
※bodyタグ内を一部抜粋しています。
    <div class="container-fluid">
      <div class="search m-2">
        <form method="GET" th:action="@{/diary}" th:object="${getForm}">
          <div class="row">
            <div class="form-group col-3 m-2">
              <label for="category">分類</label>
              <select id="category" name="category" class="form-select col-2" th:value="${getForm.category}">
                <option></option>
                <option value="1" th:selected="${getForm.category} == 1">仕事</option>
                <option value="2" th:selected="${getForm.category} == 2">趣味</option>
                <option value="3" th:selected="${getForm.category} == 3">その他</option>
              </select>
            </div>
            <div class="form-group col-3 m-2">
              <label for="category">年月</label>
              <input type="text" class="form-control" id="date_sample" name="date" th:value="${getForm.date}">
            </div>
          </div>
          <div class="row">
            <div class="col-1 m-1">
              <button type="submit" class="btn btn-primary">検索</button>
            </div>
          </div>
        </form>
      </div>
3行目
formタグ内に「th:action=”@{/diary}” 」「th:object=”${getForm}”」を追加しています。
th:action=”@{/diary}” はformタグ内でsubmitされた際にリクエストを送るURLとなります。「DiaryController.java」で記載した「@RequestMapping(“/diary”)」と紐づきます。なので「diaryListメソッド」が実行されます。th:object=”${getForm}”は値を受け取っています。「DiaryController.java」で記載した「model.addAttribute(“getForm”, form)」の値を受け取ることができます。
7行目〜11行目
th:value=”${getForm.category}”を記載することで値を保持することができます。
th:selected=”${getForm.category} == 1″を記載することで受け取った値と一致していればその値を選択した状態になります。つまり検索した後も検索条件の値を保持することができます。
16行目
th:value=”${getForm.date}”を記載することで値が入っていればその値を入力された状態となります。つまりこちらも検索条件の値を保持することができます。
取得したデータを表示
※bodyタグ内を一部抜粋しています。
      <div class="list">
        <table id="table" class="table table-striped table-hover">
          <thead class="thead-lignt">
              <tr>
                <th class="col-2">日付</th>
                <th class="col-2">分類</th>
                <th class="col-6">題名</th>
                <th class="col-1"></th>
                <th class="col-1"></th>
              </tr>
          </thead>
          <tbody>
            <tr th:each="item: ${list}">
              <td th:text=${item.date}></td>
              <td th:text=${item.name}></td>
              <td th:text=${item.title}></td>
              <td>
                <a class="btn btn-primary">詳細</a>
              </td>
              <td>
                <button type="button" class="btn btn-danger">削除</button>
              </td>
            </tr>
          </tbody>
        </table>
      </div>
13行目〜23行目
Thymeleafではループ文を記載することもできます。
th:each=”item: ${list}”の部分がそうです。ここのデータは検索条件の時と同様「DiaryController.java」の「model.addAttribute(“list”, list)」の値を受け取っています。
listに格納されているデータ数分ループすることができます。
↓ループ後のイメージ
<tr>
   <td>2020/10/10</td>
  <td>仕事</td>
  <td>仕事がんばった</td>
  <td>
    <a class="btn btn-primary">詳細</a>
  </td>
  <td>
    <button type="button" class="btn btn-danger">削除</button>
  </td>
</tr>
<tr>
  <td>2019/10/31</td>
  <td>旅行</td>
  <td>旅行楽しかった</td>
  <td>
    <a class="btn btn-primary">詳細</a>
  </td>
  <td>
    <button type="button" class="btn btn-danger">削除</button>
  </td>
</tr>
画面確認
画面で実際に確認していきましょう。
まずはデータを準備します。
| id | group_cd | cd | name |
|---|---|---|---|
| 1 | 01 | 1 | 仕事 |
| 2 | 01 | 2 | 趣味 |
| 3 | 01 | 3 | その他 |
| id | category | title | content | date | update_datetime |
|---|---|---|---|---|---|
| 1 | 1 | 仕事がんばった | 仕事を頑張りました。 | 2021-04-04 | NULL |
| 2 | 2 | 旅行 | 旅行にいきました | 2021-05-01 | NULL |
では実際にアプリケーションを実行して画面を確認してみましょう。
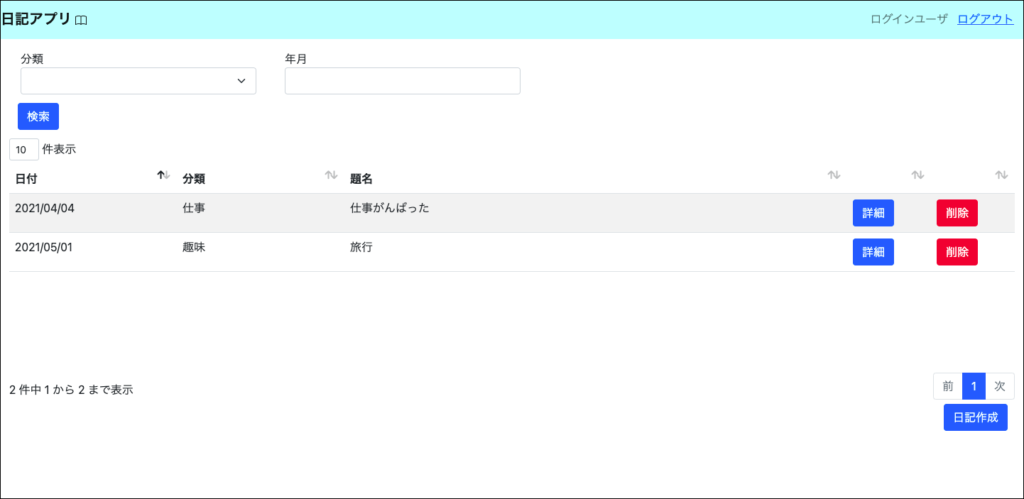
検索条件も入れて検索してみましょう。
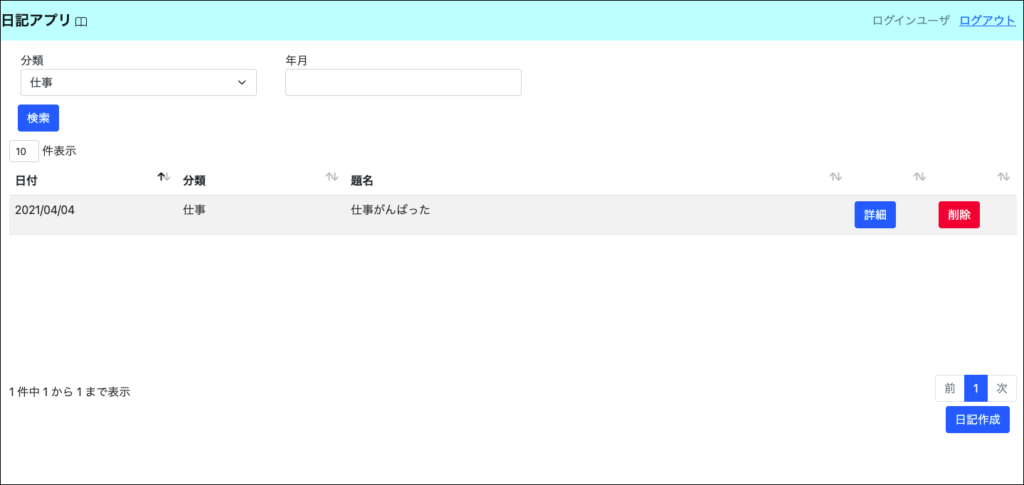
条件にあった一覧を表示することができました。
ポイント
今回のポイントのおさらいです。
・「@ModelAttribute」を使用して画面からの入力データを紐づける
・htmlにThymeleafを利用してデータの受け渡しすることができる
・Thymeleafを利用してループ文を書くことができる
次回は画面から日記の登録、削除、編集ができるようにしていきたいと思います。