
この章では一覧画面を作成し、URLをたたくと画面が表示されるをゴールに作業していきます。
DB設定も含んでいたりしますのでだいぶ長くなっています。。。
画面作成①
まずは簡単にHTMLを作成していきます。
画面が表示されることがわかったら、後ほど肉付けしていきます。
①「src/main/resources/templates」フォルダに「list.html」を作成します。
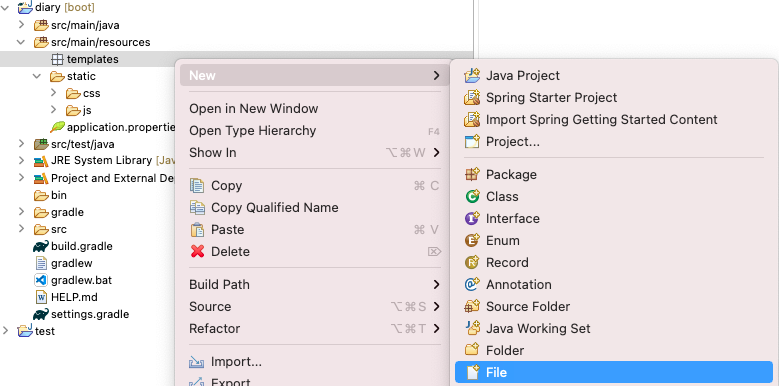
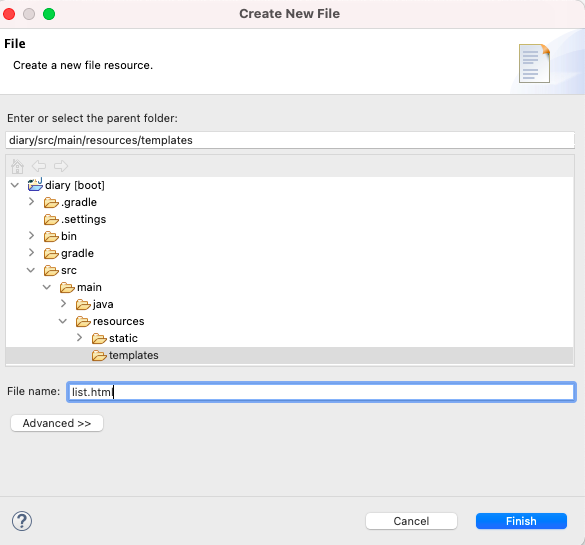
「Finish」を押すとファイルが作成されます。
②htmlの中身を記載します。
※thや@がついている部分は「thymeleaf」の記述方法です。
<!DOCTYPE html>
<html>
  <head>
    <meta charset="UTF-8">
    <title>日記アプリ</title>
    <!-- bootstrapを読み込む -->
    <link rel="stylesheet" type="text/css" th:href="@{/css/bootstrap.min.css}">
    <script type="text/javascript" th:src="@{/js/bootstrap.bundle.min.js}">
    </script>
  </head>
  <body>
    <p>画面表示成功</p>
  </body>
</html>
画面表示
MVCの構成で作成していきます。
MVCはそれぞれの役割にわけます。
M( Model) :ビジネスロジックやデータへアクセスする役割
V (View) :画面へ表示する役割(例:HTML)
C(Controller):リクエストに対してModelとViewの呼び出しを制御する役割
画面作成①にてView部分のHTMLを作成したのでControllerを作成していきます。
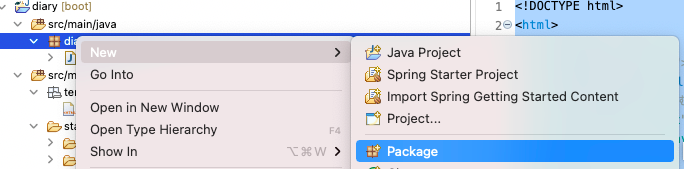
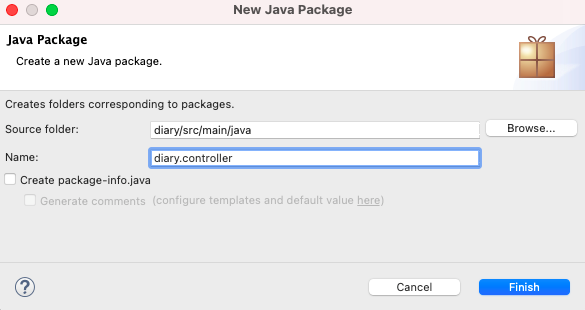
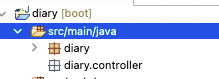
①Controllerとわかるようにパッケージを作成します。
diaryパッケージ内に作成します。
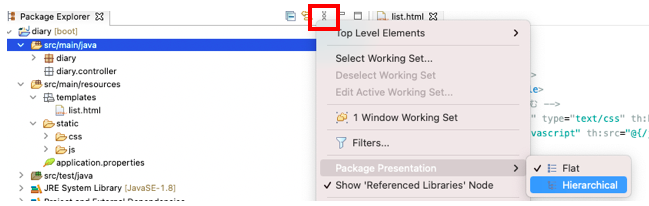
作成すると、以下のように階層表示されません。
私は階層表示の方が見やすいので設定を変更します。
「Package Explorer」の上部の点3つが縦に並んでいる部分を選択し、「Hierarchical」に変更すると階層表示になります。
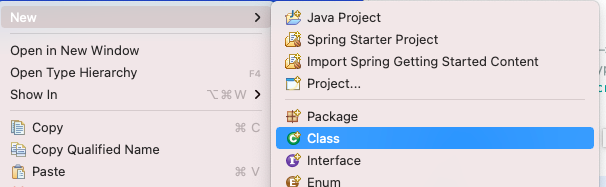
②パッケージを作成したら、その中に「DiaryController.java」を作成します。
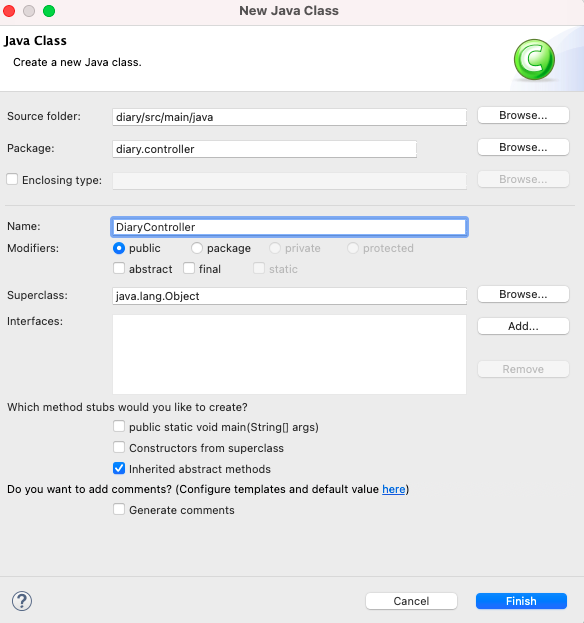
作成したファイルに以下を記載します。
package diary.controller;

import org.springframework.stereotype.Controller;
import org.springframework.ui.Model;
import org.springframework.web.bind.annotation.GetMapping;
import org.springframework.web.bind.annotation.RequestMapping;

@Controller
@RequestMapping("/diary")
public class DiaryController {
	/**
     * 日記アプリの一覧画面を表示
     * @param model
     * @return resources/templates/list.html
     */
    @GetMapping
    public String diaryList(
    	Model model
    ) {
        return "list";
    }
}
Springフレームワークには色々なアノテーションが用意されています。
「@Controller」はこのファイルがコントローラーの役割ということを示します。
これを記載することで自動でDIに管理する対象として扱われます。
「@RequestMapping(“/diary”)」はリクエストに対してのマッピングを行います。
クラスに記載すると親パスとして認識します。メソッドにも記載することが可能です。
「@GetMapping」の記載もしましたが「@RequestMapping」の派生で、GETの処理を行うという意味になります。
リクエストが来ると「list.html」を返却するようにしています。
DB情報設定
このままでは画面表示することができません。
プロジェクト作成の際に「Spring Data JDBC 」を追加しているので正しいDB設定をしていないとエラーになります。
posgreSQLのインストール、データベースを作成します。
以下を元に作成してください。

設定情報は「src/main/resources/application.properties」に情報を記載します。
spring.datasource.url=jdbc:postgresql://localhost:5432/diary
spring.datasource.username=appuser
spring.datasource.password=設定したパスワード
spring.datasource.initialization-mode=always
作成したプロジェクト上で右クリックし
「Run As」⇨「Spring Boot App」を選択すると実行します。
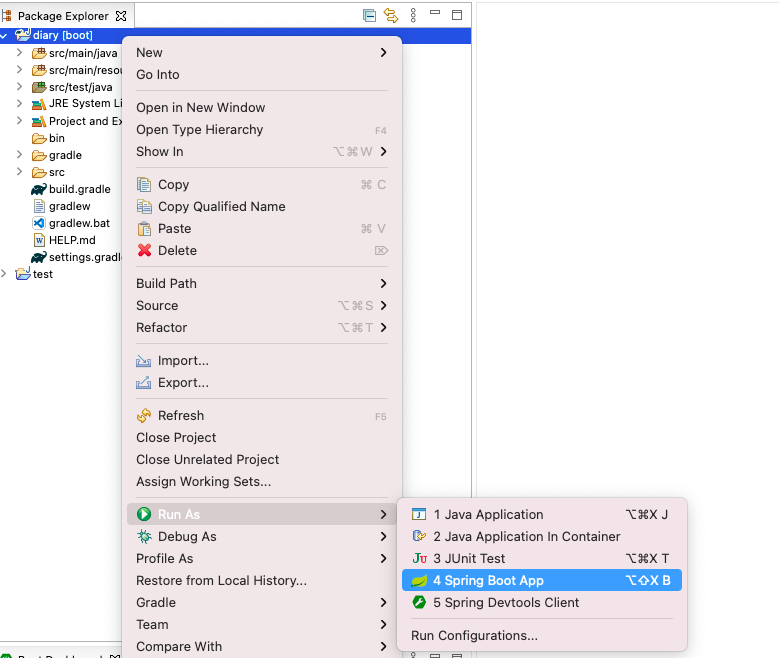
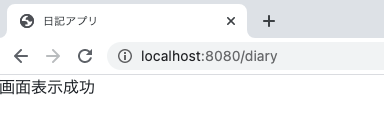
console画面にエラーが表示されず「Started DiaryApplication 」が表示されれば成功です。
ブラウザで「http://localhost:8080/diary」にアクセスする画面が表示されます。
画面作成②
一覧画面を肉付けしていきます。
①必要なファイルをダウンロード
前回のプロジェクト作成でBootstrapはダウンロードしましたがそれ以外に必要なファイルをダウンロードします。
・jQuery
公式サイトのダウンロードページを開きます。
https://jquery.com/download/
「Download the compressed, production jQuery x.x.x」を選択します。
(xはその時点でのバージョンとなります。)
開くとソースコードが表示されるので右クリックし別名保存しダウンロードします。
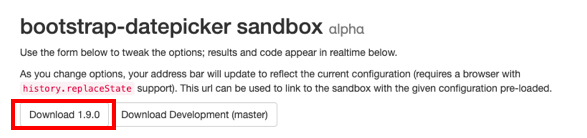
・bootstrap-datepicker
検索時にカレンダーで日付を指定して検索します。
カレンダーの部品をとしてBootstrapのプラグインをダウンロードします。
以下サイトにアクセスします。
http://eternicode.github.io/bootstrap-datepicker
赤枠で囲んだダウンロードボタンを選択し、ダウンロードします。
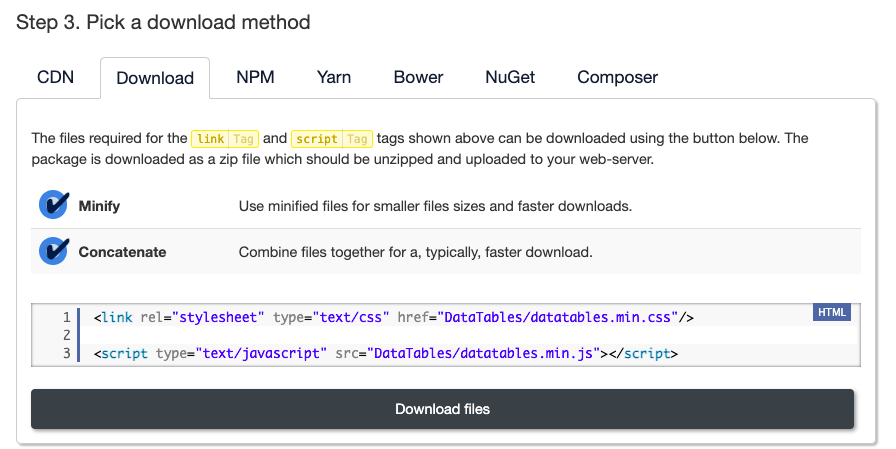
・bootstrap-datatables
検索結果をデータテーブルに表示します。
同じく部品をとしてBootstrapのプラグインをダウンロードします。
以下サイトにアクセスします。
https://datatables.net/download/
「Step 1. Choose a styling framework」で「Bootstrap4」
「Step 2. Select packages」で「DataTables」を選択します。
「Step 3. Pick a download method」で「Download」を選択し。「Download files」を押しダウンロードします。
ダウンロードファイルの配置
STS上のフォルダにダウンロードしたファイルをコピーします。
・jQuery
格納先:src/main/resources/static/js
ファイル:jquery-3.6.0.min.js
・bootstrap-datepicker
格納先:src/main/resources/static/js
ファイル:bootstrap-datepicker.min.js
bootstrap-datepicker.ja.min.js
格納先:src/main/resources/static/css
ファイル:bootstrap-datepicker.min.css
・bootstrap-datatables
格納先:src/main/resources/static/js
ファイル:datatables.min.js
bootstrap-datepicker.ja.min.js
格納先:src/main/resources/static/css
ファイル:datatables.min.css
DataTables-1.10.24フォルダ全て
③list.html記載
<!DOCTYPE html>
<html>
  <head>
  <meta charset="UTF-8">
  <title>日記アプリ</title>
  <!-- bootstrapを読み込む -->
  <link rel="stylesheet" type="text/css" th:href="@{/css/bootstrap.min.css}">
  <script type="text/javascript" th:src="@{/js/bootstrap.bundle.min.js}"></script>
  <!-- jqueryを読み込む -->
  <script type="text/javascript" th:src="@{/js/jquery-3.6.0.min.js}"></script>
  <!-- bootstrap-datepickerを読み込む -->
  <link rel="stylesheet" type="text/css" th:href="@{/css/bootstrap-datepicker.min.css}">
  <script type="text/javascript" th:src="@{/js/bootstrap-datepicker.min.js}"></script>
  <script type="text/javascript" th:src="@{/js/bootstrap-datepicker.ja.min.js}"></script>
  <!-- date-tableを読み込む -->
  <link rel="stylesheet" type="text/css" th:href="@{/css/datatables.min.css}"/>
  <script type="text/javascript" th:src="@{/js/datatables.min.js}"></script>
  </head>
  <body>
    <nav class="navbar navbar-expand-lg navbar-light" style="background-color:#CCFFFF;">
      <span class="navbar-brand">
        <strong>日記アプリ</strong>
        <svg xmlns="http://www.w3.org/2000/svg" width="16" height="16" fill="currentColor" class="bi bi-book" viewBox="0 0 16 16">
          <path d="M1 2.828c.885-.37 2.154-.769 3.388-.893 1.33-.134 2.458.063 3.112.752v9.746c-.935-.53-2.12-.603-3.213-.493-1.18.12-2.37.461-3.287.811V2.828zm7.5-.141c.654-.689 1.782-.886 3.112-.752 1.234.124 2.503.523 3.388.893v9.923c-.918-.35-2.107-.692-3.287-.81-1.094-.111-2.278-.039-3.213.492V2.687zM8 1.783C7.015.936 5.587.81 4.287.94c-1.514.153-3.042.672-3.994 1.105A.5.5 0 0 0 0 2.5v11a.5.5 0 0 0 .707.455c.882-.4 2.303-.881 3.68-1.02 1.409-.142 2.59.087 3.223.877a.5.5 0 0 0 .78 0c.633-.79 1.814-1.019 3.222-.877 1.378.139 2.8.62 3.681 1.02A.5.5 0 0 0 16 13.5v-11a.5.5 0 0 0-.293-.455c-.952-.433-2.48-.952-3.994-1.105C10.413.809 8.985.936 8 1.783z"/>
        </svg>
      </span>
      <div class="collapse navbar-collapse justify-content-end">
        <ul class="navbar-nav">
          <li class="nav-item ">
            <span class="navbar-text" th:text="ログインユーザ"></span>
          </li>
        </ul>
        <form method="POST">
          <button type="submit" class="btn btn-link">ログアウト</button>
        </form>
      </div>
    </nav>
    <div class="container-fluid">
      <div class="search m-2">
        <form method="GET">
          <div class="row">
            <div class="form-group col-3 m-2">
              <label for="category">分類</label>
              <select id="category" name="category" class="form-select col-2">
                <option></option>
                <option value="1">仕事</option>
                <option value="2">趣味</option>
                <option value="3">その他</option>
              </select>
            </div>
            <div class="form-group col-3 m-2">
              <label for="category">年月</label>
              <input type="text" class="form-control" id="date_sample" name="date">
            </div>
          </div>
          <div class="row">
            <div class="col-1 m-1">
              <button type="submit" class="btn btn-primary">検索</button>
            </div>
          </div>
        </form>
      </div>
      <div class="list">
        <table id="table" class="table table-striped table-hover">
          <thead class="thead-lignt">
              <tr>
                <th class="col-2">日付</th>
                <th class="col-2">分類</th>
                <th class="col-6">題名</th>
                <th class="col-1"></th>
                <th class="col-1"></th>
              </tr>
          </thead>
          <tbody>
            <tr>
              <td th:text="20100401"></td>
              <td th:text="仕事"></td>
              <td th:text="仕事しました"></td>
              <td>
                <a class="btn btn-primary">詳細</a>
              </td>
              <td>
                <button type="button" class="btn btn-danger">削除</button>
              </td>
            </tr>
            <tr>
              <td th:text="20100401"></td>
              <td th:text="旅行"></td>
              <td th:text="旅行しました"></td>
              <td>
                <a class="btn btn-primary">詳細</a>
              </td>
              <td>
                <button type="button" class="btn btn-danger">削除</button>
              </td>
            </tr>
          </tbody>
        </table>
      </div>
      <form method="POST">
        <div class="footer-button row justify-content-end">
          <div class="col-1 m-1">
            <button type="submit" class="btn btn-primary">日記作成</button>
            <input type="hidden"  name="isUpdate" value=false>
          </div>
        </div>
      </form>
    </div>
  </body>

  <script>
    $('#date_sample').datepicker({
      format: 'yyyy/mm',
      language: 'ja',
      autoclose: true,
      minViewMode: 'months'
    });
    $.extend( $.fn.dataTable.defaults, {
         language: {
             url: "http://cdn.datatables.net/plug-ins/9dcbecd42ad/i18n/Japanese.json"
         }
     });
     $("#table").DataTable({
       // 検索機能 無効
       searching: false,
       scrollY: 250
     });
  </script>
</html>
上記を記載してアプリを実行すると以下のような画面が表示されます。
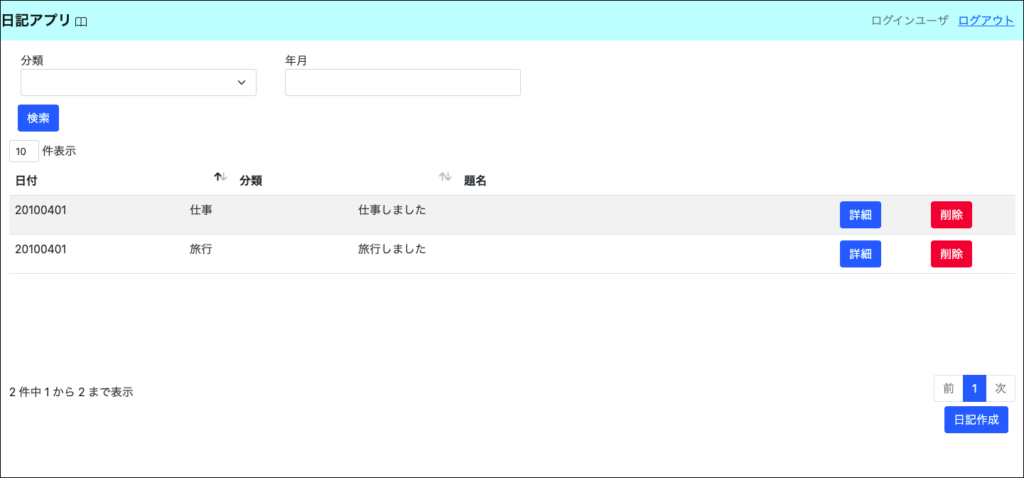
解説
class内にに記載します。例えば「class=”btn btn-primary”」と記載されている部分。
Bootstrapの青色のボタンを適用するという意味になります。なので画面では自分でCSSを記載せずとも色が設定されています。「padding」も「p-2」のように指定可能です。
公式のリファレンスをみるとどういうclassを指定すればいいか記載が載っています。
また、グリッドレイアウトを実現することが可能です。
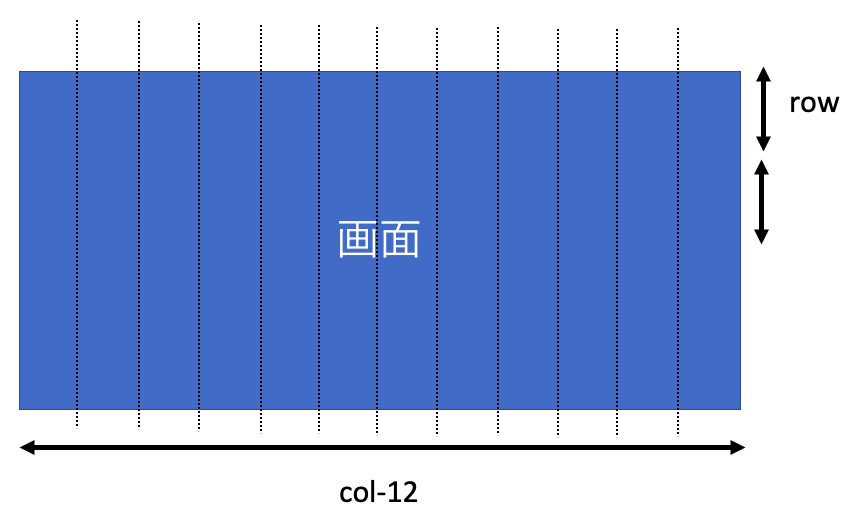
画面横幅を12分割して、どれくらい表示させるかということが指定可能です。これにより画面のサイズが変わった時でも、自動で指定した割合で表示することが可能です。ブレイクポイントも設定可能で、ブレイクポイントによって割合を変更することもできます。
rowの中にcolを指定します。なのでrow毎に改行されます。
DatatableとDatepickerのプラグインを使用しています。
使用するためにHTMLの最後にscriptでjQueryを用いています。
テンプレートエンジンの一つです。「Spring Boot」では標準的に使われているものです。
データを合成し、画面を動的に表示します。
タグ内に「th:属性」と記載するのが特徴の一つです。
今回使用としているのは以下となります。
th:text=”表示したい値”
タグ内の情報を表示します。別章にて行いますが、変数を記載し、変数の中身を表示することも可能です。また、条件演算子を記載し、trueだったら何を表示するということも記載することが可能です。
th:href=”@{}”
th:src=”@{}”
タグ内の情報を読み込んでいます。@を付加することでコンテキストパスを考慮したパス指定となります。
ここで使っているものは今後もっと学習して、別記事であげようかと思います。
本当に一部しか紹介できていませんので。
次回は実際にDBアクセスして、取得したデータを表示させることを行いたいと思います。
参考
・グリッドレイアウト
https://getbootstrap.jp/docs/5.0/layout/grid/
https://qiita.com/akatsuki174/items/53b7367b04ed0b066bbf
・thymeleaf
https://www.thymeleaf.org/index.html
https://qiita.com/opengl-8080/items/eb3bf3b5301bae398cc2